DevOps #1: Automate Yourself with Checklists
6 minute read


I Can’t Automate This!
Many years back I inherited a 30-year-old legacy code base. We were to clean up the C++ and make it work on modern hardware. However, the first step was to get it to even compile.
Before us, building the product required 3 specialized build engineers, each with individual knowledge and unusual machine configurations. Each would remap the source, compile, get a partial success and set of failures, then pass it on to one of the other two. That person would remap the source differently, merge in the partial compilation, and repeat to get a new set of errors and partial successes. This process continued through about 30 carefully-orchestrated hand-offs until the build succeeded.
Then the company had laid off all 3 build engineers, retired their machines, and hired us. No one else knew the sequence, knew the machine configurations, or knew which source mapping to use for each step.
Every step existed to work around some special case in the legacy code. Some code only built for certain SKUs, certain hardware, or certain customers. Every exception was critical to the business but blocked our ability to build the software.
Sound familiar?
It took me three months to get my first successful compilation from this codebase. 2 hours later I had an automated build pipeline, complete with unit tests. Here’s how.

Use Checklist Automation to Discover and Automate
The fundamental problem is navigation. Legacy builds provide too many options and exceptions, and we need to discover what works by experimentation. However, many experiments will have inconclusive results, so we need to keep track of everything, explore, use later results to interpret earlier findings, backtrack, and often backtrack our backtracks.
We already use a tool that supports this way of working - source control. How?
- We can map the discovery process onto a set of branches
- We can lock in partial progress with merges and pull requests
- We can abandon and resume branches as we re-interpret results
- We can use history to lock in successes, even if there is a later failure
However, we can’t yet automate our build and test. It’s complicated and there’s no source, so how do we use source control?
We start by automating ourselves, using a process that I call checklist automation.
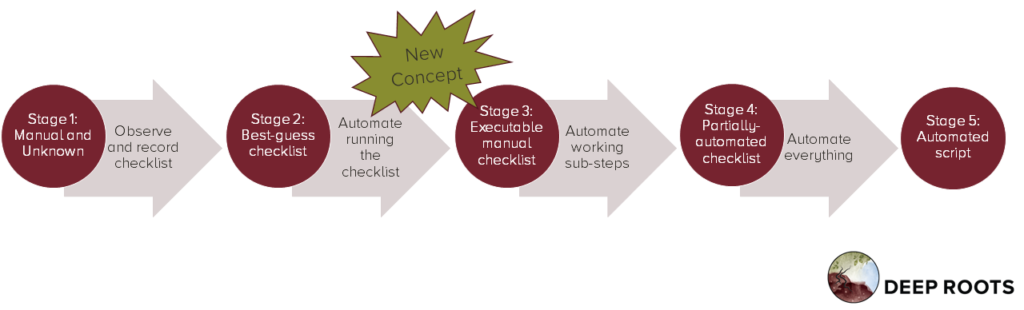
Each process goes through this sequence of refinements:
Stage 1: Manual and unknown. A few people perform the task by hand using specialized knowledge. Others may not know the process even exists and certainly couldn’t perform it.
Stage 2: Best-guess checklist. We have a written, repeatable checklist for the process. It is probably incomplete and contains errors, but attempts to get some knowledge out of peoples’ heads.
Stage 3: Executable manual checklist. This is the unusual step. We write a script that simply walks through the checklist and tells a person to do each step, one at a time. By this time we have also refined the checklist and addressed the most glaring errors.
Stage 4: Partially-automated checklist. Our script now performs some steps on its own and asks humans to do other parts. Every automated step is known to be correct, and the human steps are probably right.
Stage 5: Automated script. We have a fully-automated script to perform the process.
Every phase except the first is fully recorded into files in source control. Experiment descriptions and results are also recorded to files and checked in alongside the checklist/script that gave them. Discovery is managed via branches. Recording successes is managed by pull requests to main.
In my story above, we also needed to delete a lot of source. Much of the code hadn’t been compilable for a decade or more, but was sitting in the same file as valuable code. It would be protected by conditional compilation off constants that came from the build configuration…which was lost.
We needed to both automate the process and change the code in sync with our process discoveries. That is also common with legacy code.
We solved that by checking in all our checklists and experiments alongside the full product source. We could then change both process and code in the same commit. Our branching handled discovery and experimentation in code and process simultaneously.
Now we can navigate our way to a repeatable process and divide discovery work across the team.
Access the recipe to automate a process using checklists, as well as other recipes coming in the future!

Just Enough Automation
Our team is now able to discover the details for a manual process incrementally. We automated each part ‘../../post/automate-checklists’as we understood it, without a lot of overhead. We can still use manual execution for the parts we are figuring out. We can make our process rigorous, verify it is correct, and then automate it - without delaying automation too much.
Additionally, we are paying automation costs incrementally. The iterative approach naturally causes us to spend our automation efforts on the processes that we perform most often, without having to plan for it.
Taken together, we now have a path to automate even the gnarliest build, test, package, and deploy processes. Getting to CI no longer blocks our DevOps journey.
Benefits:
- Spend automation time where it will save you the most process time.
- Budget for automation without having to plan and predict every processes.
- Discover process variations as you go.
- Record insights and wrong directions into source history so you can learn.
- Easily go back to ideas that seemed wrong but turn out to be right.
- Scales to any complexity, one commit at a time.
Downsides:
- Requires discipline about your manual processes. You must do them in pairs and with care.

Demo the value to team and management…
Show three things at your sprint demo:
- Example: One checklist and process execution.
- Progress: Progress dashboard.
- Impact: Total time spent on manual and automated processes.
Example: One Checklist and Process Execution
Your goal is to show that you now have a more rigorous description of your existing process. It may not be right, but you have something that you can edit and change what actually happens.
First show your checklist, in whatever iteration it is.
- State who used to do the process and describe the obstacles it caused.
- If it is still a checklist, show the file. If it is executable, run it and show the output.
- State how many times you performed this process this sprint.
Second show the discovery.
- Show all the branches you have made so far.
- Identify chunks of the checklist that you remain unsure about.
- Show the chunks that you were unsure about but have refined.
Progress: Progress Dashboard
Count the total number of checklisted processes in source control. Count the total number of manual and automatic steps across all those processes. Estimate the number of non-checklisted manual processes. Show the number of processes recorded and estimated to record as an area chart over time. Show the total number of manual and automated steps as an area chart over time. Include both charts on one dashboard.
Impact: Process Savings
Step 1 Track total manual and automated execution time per week, each week.
Step 2 Create placeholders for any large or frequent manual process that you can’t checklist yet but want to include in the stats.
- Create a one-step process, with the step “do everything.”
- Automate running this checklist so that it can record times.
- Include these executions in your spreadsheet.
Step 3 Track the amount of time you spent this sprint recording or automating processes.
Step 4 Add total execution times to your dashboard. Record the time spent automating this sprint and place that next to the process time chart on your dashboard.