DevOps #9: Ease Integration with Hexagonal Architecture
11 minute read


How do I Know I’m Using My Dependencies Correctly?
Our goal is to simplify integrations between my component and my dependencies. Using techniques from the last two newsletters, we can isolate my component from unwanted complexity in a dependency, and then verify that the dependency continues to work as I expect. However, one glaring hole remains: how do I ensure that my code uses the dependency correctly?
We’ve Already Solved Almost Everything
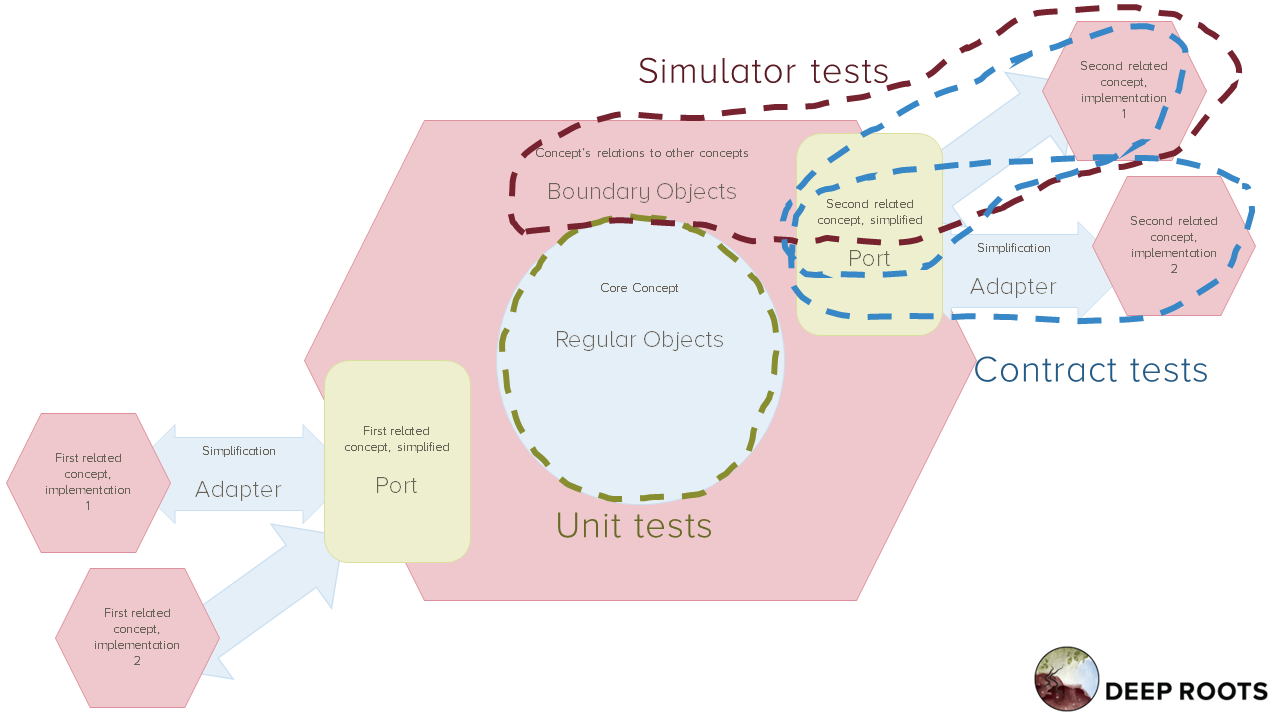
You may recall that we have encapsulated each of our dependencies behind a Port. The Port presents a simplified way to interact with the dependency. It exposes exactly the way that my code wishes that dependency worked. An Adapter adapts the Port’s API to the much more complicated real API for the dependency.
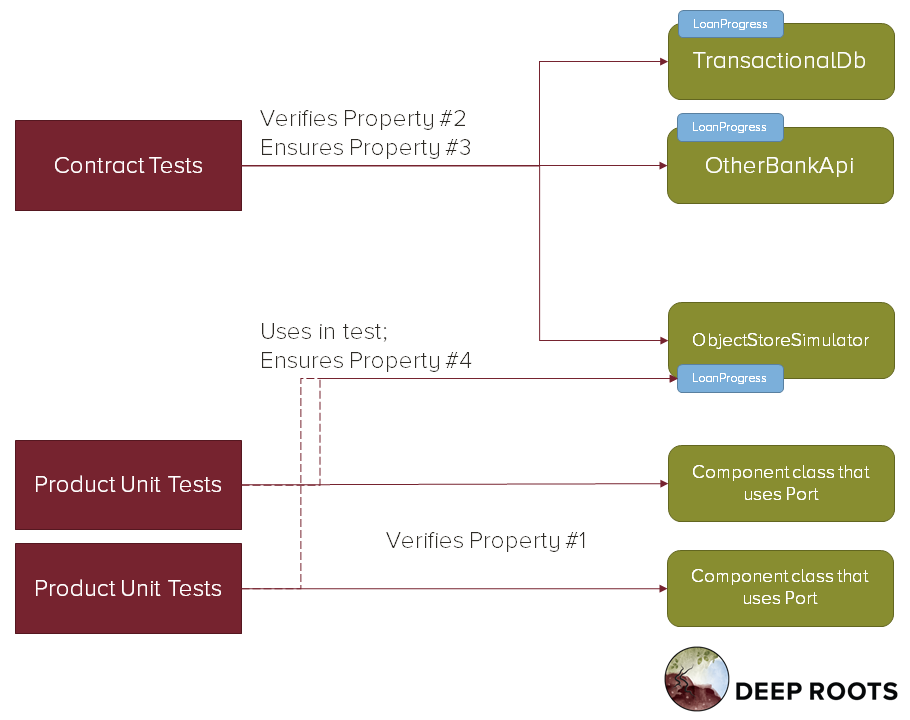
In this architecture, known as the Hexagonal Architecture, I can verify integration correctness without running any integration tests. Instead, I just need to verify 4 properties:
- Property #1: My system uses the Port as intended.
- Property #2: Each outside system, when adapted by my Adapter, implements the Port’s intention.
- Property #3: The tests for each Adapter in item 2 use the same intention.
- Property #4: The intention in items 1 and 2 are the same as each other.
We’ve already created test suites that verify properties 2 and 3. But how do we verify properties 1 and 4?
Mocks — Remember Why the Obvious Solution Doesn’t Work
Most teams reach for Mocks, Spies, Fakes, or other test-configured doubles in order to verify that their code uses the Port correctly. They execute their code against a fake Port.
The test uses this fake like a puppet. It controls how the fake responds when it is called, triggers outbound calls (events or callbacks), sends errors and exceptions, and verifies that the code calls the intended methods. This gives the test complete control over your product code. It can set up any situation it desires and then verify your code’s responses.
But this doesn’t work because it prevents verifying the 4th property. Each individual test puppets the Port to verify property 1, so there is no way to ensure that the test code behaves the same as the Adapter’s code.
The Mocking strategy is likely to appear to work at first, but will fail to find integration bugs when the Adapter changes. Changing the Adapter doesn’t automatically change the mock-driver code in the tests. There is nothing to even tell you which tests have to change and how!
This is a duplicate code problem. So how can we fix it?
We Need to Give Tests the Power to Guide, not Control.
The test still needs to be able to set up a situation and then see how the product code responds. And we need to be able to execute callbacks, simulate error conditions, and verify that data flows in and out of our Port correctly.
For example, assume I am testing my code that reads from a file system. I need to verify normal read of a file’s content into a string. But I also need to check how my code behaves when it reads non-unicode binary in the file, or when the file can’t be read because of locking, permissions, or some other error.
My test needs to be able to set up various real-world scenarios and then assess my program’s behavior. How can I do that without using the real implementation or duplicating the real implementation for that scenario?

Use a Simulator Test
Our tests need a Simulator — a Port implementation that has properties useful for testing:
- The test can easily get it to a known starting condition, including error states.
- The test can easily inspect its state after the product code finishes.
- It supports the same error conditions as the other implementations.
- It is a regular, in-memory class without dependencies or statics. It uses no resources other than memory.
With such a Simulator we can verify properties 1 and 4 at the same time. We test our product using the Simulator as the Port implementation, rather than mocking out the Port. This verifies property 1.
These simulator tests combine with our existing Contract Tests verify property 4. We run the same tests over the Simulator as any other Port implementation, so we know all Adapters are all in sync.
The Best of Both Worlds
We are testing the code against a real dependency except that the dependency is simple. We get the advantage of an integration test — no duplication of behavior. But we also get the advantages of a unit test — no combinatorial complexity, test entirely in control, and tests that run in milliseconds with complete parallelization.
Is a Simulator a Fake?
Yes, no, and it doesn’t really matter that much.
Sometimes this Simulator is a special class used only for testing. For example, we might have a Clock Port, with a StoppedClock Simulator — an in-memory clock that only advances time when the test tells it to.
However, other times it can be one of the standard implementations. For example, we might have a serialization Port to which we store objects. One product might need a cache, so has one implementation which just stores objects in a dictionary — that would be a perfect Simulator for our tests.
And often a Simulator starts out life as test-only, and then a new feature makes use of it. The code moves from being test-only to being product code.
In any case, the Simulator is always independently testable and tested code. That is different from most other test support code. We run our Contract Tests over it and ensure that it behaves correctly — whether it is currently test code or product code.
What Happens When a Dependency Changes?
Let’s assume that one of your Dependencies changes its API. Our tests will lead us through our many options in response.
- The Contract Test for that implementation will start failing, when run in that dependency’s platform suite.
- You then decide whether your application cares about this API change. They may be adding a feature that you want to leverage, or they may just add complexity you would like to ignore.
- If you don’t care about the change, then you will have to extend your Adapter to manage the additional complexity. Use TDD in your Adapter code; your Contract Test operates as an acceptance test.
- Otherwise continue.
- Update your Contract Test and Port to describe how you wish the Port to expose the new capability.
- You may still have to TDD some changes in this Adapter. Do so until the Contract Tests pass for this implementation.
- Now update all of your other Adapters to pass the new Contract Test. This will include updating the Simulator.
- Now some of your product unit tests will fail. Fix them.
- Anything that really depends on the changed behavior in the Port will suddenly start failing.
The interlocking set of tests ensures allows you to respond to the change in any way you would like - but requires your response to be consistent so there are no integration bugs.
The Hexagonal Architecture
Simulator testing, combined with contract testing and ports and adapters for dependencies from prior newsletters, makes up the Hexagonal Architecture. Hexagonal Architecture replaces Layered Architecture, giving a similar separation of concerns while improving testability.
Where the Layered Architecture orients your codebase on the concept of up and down, the Hexagonal Architecture orients your codebase on the concept of in and out. Each core concept in your product is encapsulated into a hexagon. Code tightly related to the concept is inside the hexagon, code unrelated to the concept is outside, and code that integrates the concept with other concepts is on the border.
Organize Your Codebase by Decomposing Concepts
As each concept can be broken down into sub-concepts, each hexagon can also be broken down into sub-hexagons. This lets us organize a codebase into a tree of concepts. Each level consists of an overall concept constructed from a smallish number of sub-concepts. And the codebase represents that as an overall component constructed from a graph of a smallish number of sub-components.
Even the tests follow the same pattern. Core unit tests verify the innermost functionality. They check the core concept. Those core tests can be organized in the same concept hierarchy. Simulator tests verify the inside edge of the boundary. They check that the concept in this hexagon interacts with other concepts as intended. Contract tests verify the outer edge of the boundary. They look from the inside of each hexagon to make sure the other hexagons behave as expected.
Implement a Hexagonal Architecture for your component, consisting of Ports and Adapters for each dependency, verified by Contract and Simulator tests.
Access the recipe to Create Simulator Tests.

Integrate with Independence
Verify that your component and its dependencies will all work together, without having to test them together. Verify integration at unit-test speeds. Each team sees integration problems it will cause before commit and can fix them before they have impact. Each team is able to operate independently without causing integration problems.
Additionally, each team adopts the Hexagonal Architecture for their components. Each team can understand as much of the whole system as they need, from their own perspective. The system looks like an onion, with their code in the middle surrounded by rings of successively less-related code. Architects can understand the whole system as a set of concept decompositions. Each sub-concept is directly represented in code as a hexagon. Each interaction between concepts is directly represented as a hexagon’s boundary, including its boundary code, its Ports, and its Adapters.
Benefits:
- Reduce cost of each integration test from 10-90 seconds down to 1/1000th of a second.
- Reduce required number of integration tests to verify system from exponential in number of components to linear in number of components.
- Each test has a clear owner. That owner knows when to update it and when to fix it.
- Tests will rarely or never be run by anyone other than their owner, so teams don’t need to coordinate test fixes.
- The system architecture is understandable as a whole.
- Individual teams can understand their code’s context without having to understand the whole system. They can understand more-related code in more detail and safely ignore less-related code.
Downsides:
- Each team needs good testing and refactoring discipline. It took many steps to get here. The benefits will only show up where teams make effort - other code will remain a mess and keep the monolith tangled. That means the monolith will still generate “spooky action at a distance” bugs, and will still be hard to understand as a whole, even if parts of it are clear.

Demo the value to team and management…
Show three things at your sprint demo:
- Example: boundary code and its test.
- Progress: count of bad or missing boundary tests.
- Impact: boundary clarity.
Example: Boundary Code and its Test
Your goal is to show one portion of the boundary for your hexagon. You want to show that your code’s core concept is clear, has obvious relationships with other concepts, and that those interactions are verified.
Show one piece of your boundary code and its simulator-using tests. Show how the contract tests verify that your simulator is consistent with the other implementations. Show the way the port simplifies the related concepts to make your code clear and easy to understand.
Finally, show how you have organized your code so that it is easy for you and others to identify the code that makes up the boundary between your concept and another — the Ports, Adapters, and Port-using code, as well as all the related tests.
Progress: Count of Bad or Missing Boundary Tests
Add up the following in order to estimate the number of simulator tests you have left to write:
- The number of boundary tests that use mocks or anything except a tested simulator.
- 10 times the number of integration tests that use your code with a real dependency.
- The number of untested behaviors in your boundary code (missing tests). You can estimate this as 5 times the number of untested methods.
Track this number over time with a simple line chart. Show the chart every week to show your progress.
Impact: Boundary Clarity
Measure your boundary clarity using three independent numbers:
- Integration test suite run time.
- Number of integration bugs your team experiences.
- Number of bug investigations or integration questions your team is called in to help with.
Chart each of these over time. Your integration suite run time should go towards a low, steady-state number, usually 1-2 seconds. Your integration bug count should go to zero, though that may take a few quarters after your integration test numbers look healthy. Your investigate calls should also go to zero, as other teams are able to understand your code without bothering you and rule out your code in their investigations. It may take up to a year for the investigation calls to drop to zero, but you should see a significant reduction in the first quarter.
If your team manages multiple components, measure these independently for each component. Include integration issues and requests for help that arise between your own components in your counts.
Because these impact numbers change slowly, demonstrate them each month or so until they have reached steady-state.